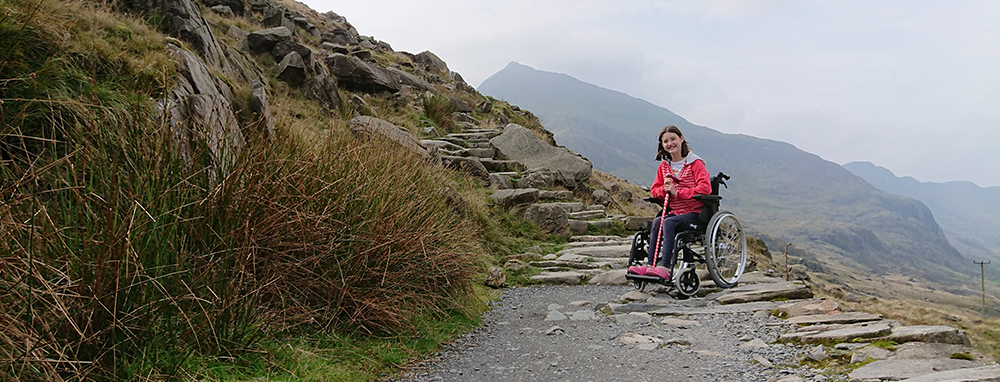
The Mountain Wheelchair project is no longer active. Seeing Ada stand up again for the first time, I turned my focus away from building the wheelchair to instead helping Ada to build up her health. She is still in a lot of pain and struggles on a daily basis, but... She has returned to school and achieved many A's/A*s in her GCSEs, takes "Outdoor Recreation" as one of her subjects, and is currently attending the Duke of Edinburgh Award. To top it off, she has since walked up the highest mountains in England, Wales, and Scotland!
As for myself, my energies are now going into delivering outdoor activities for Climb Wales where I get to help other young people (as well as adults) get out and enjoy the great outdoors. Primarily based in Snowdonia, North Wales, we work as mountain guides and also deliver a number of outdoor courses, such as:
Finally, a big thank you to everybody who supported the project. It gave Ada (and myself) hope, something to look forward to, when times were very dark.
Yesterday, when I got home from work, I was absolutely shattered and didn’t want to do much of anything other than lay down on the sofa and fall asleep, but as I lay there, struggling to keep my eyes open, I glanced over at the mountain wheelchair parts and decided to crack on!
I’m really glad I did as I managed to get all six wheels laced. Ta-da! Six wheels for the mountain wheelchair!
Six Mountain Wheelchair Wheels
It’s taken quite a lot of modification for the wheel rims to accommodate the spokes. I think they might be motorbike or scooter spokes? By the time I’d finished the fifth and six wheels, I realised I’d done a much better job of these than I had the first and second wheel. With this in mind, I will definitely need to do two wheels again and perhaps even four. Still, I’m really happy with the result and the spokes look like they’re up to the task of transferring the motor torque to the wheels.
As I was tidying up the mess I’d made in my “living room” whilst lacing the wheels, I decided to throw out the boxes that the motors had arrived in. The sense of elation I got just from throwing out some boxes is, in a sense, quite funny. For me though it signified a step forward. No longer are the motors being kept in storage; I’ve actually started building this thing!
The really cool, yet at the same time worrying thing about having all of the wheels made is that in the process, I realised how quick and easy it would be to make a four-wheel-drive platform for testing purposes. Nothing complicated as I don’t want to waste too much time on it, just a plank of wood laid across four wheels would be sufficient. This would at least allow me to see if four of these motors are capable of carrying a heavy bloke like me up a hill. If not, then it will put a huge question mark over the entire Mountain Wheelchair project!
It’s taken me the best part of the day to filing away so that the motors fit onto the forks, but it’s done, and all six motors are now sitting in the forks. Shoulder aching, I decided to push on and managed to get another wheel laced, then much to Ada’s delight, mocked up part of the frame (a bogie) for the actual Mountain Wheelchair!
Woohoo! It’s been a busy day in the shop. The spokes FINALLY arrived from China today and I managed to get the first wheel made.
It’s a motorised mountain wheelchair wheel!
First Motor Laced on a Mountain Wheelchair Wheel
Most of the the time was spent with a drill and file trying to get the separate parts to fit together, so although it’s a little bodged at the moment, it’s taken such a long time to get to this point that it feels like an important milestone.
I got Ada to control the throttle for a moment whilst I let the wheel roll on the floor. It’s much faster than it needs to be, but I think that will add to the fun of driving the wheelchair once it’s finished.
As well as the spokes, the “C Washers” which I had laser cut arrived today too and the guys at Microkerf did an excellent job. They’ve been extremely helpful and I’d definitely recommend them:
As I said in a previous post, I can’t be the only person who needs these washers so have listed them on eBay to try and raise some funds for the wheelchair.
E-Bike C Washers
Also currently on its way from the USA is a part which I hope will enable me to make the mountain wheelchair radio controlled – useful for testing purposes and driving it on/off trailers etc.
It’s also worth mentioning that Google doesn’t like us at the moment and we’re currently on page 3 for the search terms “mountain wheelchair”, however, on Bing at least, we are the very first result at the top of page 1.
Some more parts arrived from China today which have enabled me to make some progress with the wiring for the mountain wheelchair:
Mountain Wheelchair Wiring
Put Simply
In simple terms, these components add some additional protection into the circuitry and much to Ada’s delight, the wheelchair now has a key ignition switch.
Detailed Version
In more detail, each controller should draw a maximum of 15 amps. With 6 controllers, that’s a peak of 90a (15 * 6). So the first component on the positive wire is a heavy duty 200a fuse.
The next component is the big red emergency stop key switch. This acts as a master switch and completely disconnects the battery.
Next is a keyed ignition switch which goes to the power switch on the controller. Although this is still operating at 48v, it only draws a maximum of 40ma so it is much easier to route cable so that the key is somewhere accessible. This also has an inline 2a fuse.
After this is a 200a main contactor. The key switch closes the contactor at which point the large capacitors in the controller draw a substantial amount of current. To prevent the contactor from welding closed as a result of arcing, there is a 1k Ohm 10w resistor across the main contacts. Because this resistor is in place, it meant that the controller was always connected to the battery (regardless of whether the contactor was closed or not), thus draining the battery. Hence the need for the big red eliminator.
The plan is to have one key ignition and one contactor to supply power to all six controllers.
Although not shown here, I’ve also successfully wired a thermistor inside the motor housing. The manufacturers have suggested a theoretical max operating temp of 120℃ for the motor. To allow some wiggle room, the controller will cut power to the motors if they reach 90℃.
What’s Next?
The next job in terms of wiring is to include a watt meter. To this end, I’ve purchased a really cool Eagle Tree E-Logger. Not only does it monitor and record power consumption, temperature, speed and altitude, but also plots all of this into graphs and with an additional GPS unit, can display all of this data alongside a satellite map of the route you’ve taken. This sounds extremely useful because it will allow me to see where spikes in temperature and power consumption have occurred, as well as providing the tools I need to make far more accurate estimations of battery capacity needs. Although it’s intended for radio controlled aeroplanes, it’s good for up to 80v and 150a so should be perfect for the mountain wheelchair.
I finally bit the bullet last week and outsourced the manufacturing of parts for the first time.
The mountain wheelchair frame is in part being made using BMX bicycle forks. The parts at the end of the forks, where the motor axles sit, are called dropouts. Looking at the image below, you can see that there is a circular indentation in the dropout where the motor axle sits.
Mountain Wheelchair Lawyer’s Lips
This indentation is intended for quick release wheels. If the cyclist doesn’t tighten up their quick release wheels properly, then this raised edge will help to prevent the wheel from falling off. The common term given to the raised edge is a “Lawyer’s Lip”. I believe this is because they were added for legal reasons.
For the mountain wheelchair a quick release mechanism isn’t needed. In fact, it creates a problem; because the axle isn’t perfectly centred in the dropout, this means I don’t have a washer to fit, and therefore the nuts which hold the wheel in place will only press against the raised edge. The front forks on BMX bikes were designed for any amount of torque; they just hold the front wheel in place whilst all the drive comes from the back wheel. Considering the torque produced by the wheelchair motors, this becomes quite a large problem. If the nuts holding the wheel in place only press against this raised edge, then it’s quite likely that the wheels would fall off whilst driving the wheelchair in the mountains.
To help prevent this from happening, I decided to design a washer which would fit the void where the quick release mechanism is supposed to sit. To begin with, I 3D printed the part to ensure a good fit:
Mountain Wheelchair 3D Printed Lawyer’s Lips Washer
Safe in the knowledge that my measurements were correct, I started looking for quotes to laser cut the washers from stainless steel. The first quote for 20 washers was £150! Eek! That’s a lot of money just for a few washers.
The following day, another quote arrived for £80. Looking through the pricing structure, I realised that the £80 was a minimum fee, and that my parts were actually only costing £12. After discussing this with them, I discovered that I can order 150 washers for the same price as 20, so this is what I decided to do. Hopefully I can sell these on eBay and recover the costs. After all, I can’t be the only person having to overcome this problem.
The company have sent me a sample before placing the order and they seem perfect:
As I say, this is important for the mountain wheelchair because it will go some way to preventing the wheels from falling off, and it’s my first experience of outsourcing some of the work.
As said though, the forks aren’t designed for high torque motors, so whilst this will help to stop the wheels from slipping off, it does nothing to prevent the forks from snapping. I do have an idea for this, but this will have to wait for the moment as I have plenty of other things to be getting on with.
So, the other day I was over the moon when I wired up one of the mountain wheelchair motors and witnessed it spinning for the first time. It’s taken so long to find a suitable motor that this felt like quite an important milestone in the project.
However, and it goes to show that I don’t really know what I’m doing, I’ve managed to partially destroy said wheelchair motor…
In the video below, you can see that the motor spins in the forwards direction without problem, but starts to make a funny noise when reversed. Initially I thought this was a software feature of the controller which was limiting reverse to half speed. That is until, part way through the video, the motor stops turning in reverse at all, a warning light appears on the controller, and then suddenly, although not caught on camera, smoke starts to bellow from the motor! I quickly disconnected everything from the batteries but was unable to capture the smoke on film:
As soon as I put my camera down I placed my hand on the motor and was astonished at how hot it was. In an attempt to reduce the damage I decided to open up the motor so that it would be easier for the heat to dissipate, but it was too late; as you can see by the burnt coils in the image below, the damage was already done.
Burnt Wheelchair Hub Motor
The Cause of the Burn-Out
There are three wires which run between the controller and the motor. Although they are from different manufacturers, they appear to have adopted the same standard; both have a Yellow wire labelled “Phase A”, a Green wire labelled “Phase B”, and a Blue wire labelled “Phase C”. Yellow goes to Yellow, Green goes to Green and Blue goes to Blue, it’s obvious right? wrong!
Because I’d done the obvious thing and made the mistake of wiring the motor according to the manufacturer’s specifications, it meant that as I was trying to reverse the motor, it was actually fighting against itself (think of two powerful magnets both trying to pass through each other). This is what caused it to overheat so quickly.
It was quite frustrating at the time because it highlighted the fact that I don’t really know what I’m doing. I had no idea the manufacturer’s wiring could be wrong. I had no idea it would burn out so quickly. What else will I mess up further down the line?
The Solution
With a little digging around I found that wiring the motors is a matter of trial and error, and completely ignoring the manufacturers’ diagrams. As well has the three phase wires, there are three matching hall wires, so in total, there are 36 possible wiring combinations. You just have to try each one until you find a combination that works.
Anyway, much trial and error later, and not only is the burnt motor working perfectly in both forwards and reverse directions, but I’ve also added an additional fail safe…
Preventing the Wheelchair Motors Burning Out Half Way Up a Mountain
Seeing how fast the motor burnt out put a bit of a dent in my ego, but that was nothing compared to the potential consequences of getting stuck in a wheelchair half way up a mountain because a motor had suddenly burnt out.
In light of this I’ve been able to add a “thermometer” into the circuit which automatically cuts power to the motors if it gets too hot, and then lets the motors resume normal operation once it has cooled down again:
This way, when Ada is driving up a particularly difficult section of mountain in the wheelchair, and one motor suddenly gets too hot (110°C), either the power of the other wheels will keep propelling her forward, or, the wheelchair will come to a stop and she’ll have to let the motors cool down for a moment (to 95°C) .
This does mean having to modify the inside of the motors to accommodate the thermistor, but looking on the bright side, at least I now have a guinea-pig motor to run tests on!
Phase / Hall Wiring for Kelly KBS48101X and Mac 536HF
And finally, just in case somebody else stumbles upon this page because they found the same combination of motor and controller didn’t work for them, here’s a working phase / hall combination of a Kelly KBS48101X controller and Mac 536HF motor:
It’s been a little quiet on the blog over the last week or thereabouts so I wanted to I’d like to share a number of things that have happened during that time…
Spokes
After dropping off the motors and wheel rims at Halfords in Llandudno, the guys were able to take all of the measurements, but weren’t able to locate the correct spokes from any of their suppliers. Just like me, they did some digging around and the only suppliers they could find were in China. I’ve since ordered the spokes from China, but of course they’re all celebrating the Chinese new year at the moment so it’s going to be a number of weeks before they arrive.
Battery Pack
The first 48v battery pack is ready. After bottom balancing all of the cells, I was impressed as they were charging as most of them remained within 0.001v of each other, and there was just one other cells which was 0.002v behind the others. Fully charged, this is a 56.5v battery:
Mountain Wheelchair 48v Battery Pack
Interestingly, John Williamson (Aka Burgerman) of www.wheelchairdriver.com has been reading through my posts, and based on his background working with charger manufacturers in an advisory capacity for 25 years, he’s suggested that bottom balancing is the wrong way to go about this. Thanks for taking the time to read my posts John, I think more research is required on my part.
Grinding away the Dropouts
With much trepidation, I spent a large part of yesterday grinding away part of the BMX forks to get the motor axles to fit. Looking at them though, I’m really worried that the dropouts on the forks (the part where the axle will sit), aren’t going to handle the torque produced by these motors. I’ve had to file so much away, that there’s far less metal on the forks now than there used to be. Originally, I imagine an engineer would have calculated how much metal needs to be there:
Mountain Wheelchair Filed Dropouts
Snapped dropouts is a common problem with e-bikes:
To overcome this, you can buy and attach what’s called a universal torque arm. This arm takes the torque produced by the motor and transfers some of it higher up the forks where they are stronger:
My only problem with this is that I think they look untidy. I gave it some thought last night and have made some rough sketches of a purpose built “torque arm” that will bolt to the frame. If I can get those made up at a reasonable price that’s what I’ll do, if not then I guess I’ll have to go with these unsightly universal torque arms.
At least the motors look cool now that they’re sitting in place and Ada’s really pleased with the purple dust cups which she chose.
Mountain Wheelchair Purple Dust Cap
Motor Controllers
Six motor controllers arrived from China yesterday and at first glance I’m really happy with them. They’re far smaller than I expected them to be which means they’ll be easy to fit within the mountain wheelchair frame.
Mountain Wheelchair Motor Controllers
The main problem I have with these controllers though is that the Chinese user manuals have been badly translated into English. Trying to understand what the manual is trying to say is rather difficult.
Whilst I was waiting for the controllers to arrive, I was however able to produce a wiring diagram to provide power the 6 motors:
6 motor wiring diagram for mountain wheelchair
Once I had the wiring diagram and knew what I wanted to achieve, I then spent days searching through online components for the parts I needed. Trying to find a simple thing like a 48v switch (200a and waterproof) has been impossible in the UK so I’ve had to resort to getting parts shipped from China again.
Actual working Mountain Wheelchair Motors
Nonetheless, and this is quite a big moment, I’ve just managed to get the actual mountain wheelchair motors running for the first time!
You’ll have to excuse the temporary wiring, but, Woohoo! It’s working!
This was the scariest moment so far in the mountain wheelchair build…
Last night, I dropped off all of the motors and wheel rims at Halfords Autocentre in LLandudno.
This will be first task that I’ve had to get somebody else in to complete and I felt extremely nervous walking away, leaving all of the wheelchair parts in somebody else’s hands – What if they don’t do a good job of it? What if they drop one of the motors? What if something gets damaged? Do they realise how important they are?
To be honest, the two people I spoke to were very reassuring, and the girl at the counter added to the label “Guard with your life”.
They were kind enough to let me take a photo for the blog – “bye bye motors, it was nice knowing you”
Left at Halfords – Mountain Wheelchair Motors and Rims
And, they even said they’d take some photos as they carried out the work which was pretty cool.
If you’re reading this Will, then I’d just like to say a big thank you for offering to do it. In the end I thought it best to go to a store to do it because it meant that if they did get damaged then I’d be able to recover the costs.
All in all, I’m a little nervous, but at the same time extremely excited. The wheels were one of the first things I started thinking about when I began this journey. Once the motors are sitting in their rims, they will be the first part the mountain wheelchair which will be finished. No more research, no more designing, done, finito!
So long as everything goes well of course :S
*Update*
Received a call from Halfords the following day to say that they had done all of the measurements and found that they needed an odd size spoke which they couldn’t obtain from their suppliers. They did however email me a link to some on ebay, but they’d need to be shipped from China. The good news is that they’ve done all of the measurements and at least now I know what size spokes to get.
I’ve been into Halfords to collect the motors as the motor controllers will soon be arriving and I want to start playing with the electronics whilst I’m waiting for spokes to arrive.